Pages

Bienvenue


Occasionally it seems that world is in pure chaos with nothing making sense, but that doesn't matter as long as I can sew. Sewing is a form of art, or at the very least creativity, and a form of expression. A great outlet for the tension of everyday life. Also you can make cute things. The craft revolution is truly taking place, old skills are being revived by a new generation, but with a seriously modern twist.

I've made Mario pillow cases, a giraffe print background, and turned duvet covers into summer dresses. I enjoy making something unique, special, and me- then I like wearing it and watching it fall to pieces or not fit properly. Then I enjoy (slightly less) fixing it.

One day I shall have a room filled with glorious fabrics and boxes of notions, and on that day I will have found my nirvana. But until then this blog will exist as my virtual haberdashery and sewing room. Hopefully you'll enjoy looking at my creations as much as I enjoy looking at other blogs, and you'll be inspire to make something of your own.

Wednesday, 12 September 2012

Awesome Trouser Fix

I have a lot of trouble buying trousers...well not with buying trousers but with finding ones that fit.  I have become quite an expert at buying trews that don't fit.  The issue is not with size but with shape, I have no issue with wearing a size 10 or a size 20 if that's how the shop wants to size their clothes (although some consistency through the high street would be appreciated) but you can't take a size 10 designed for a thin woman with no curves and just make it bigger and expect it to fit a fairly slim woman with some curves. 

Anyway, my issue is that to fit over my thighs and butt I have to get a size far to big for my waist, so there is always gapping around the waist, especially at the back.  I was contemplating  taking them in at the waist and thinking that removing the waist band and cutting a chunk out of it, taking in the trousers and reattching the waist band was the best way.  Which gave me a stress head and I threw them in the corner of the room and ignored them for a while. 
Enter the internet!  And I saw something on pinterest about using elastic in the back of the waistband, so that's what I tried.


I cut two small strips of elastic and sewed them (with zig zag stitch to allow for stretch) in the back of the waist band, I pulled them taut and then sewed so that they scrunched closed after sewing taking the trousers in.  It took a few attempts because zig zag sewing of taut elastic is not easy especially when you are at least partially incompetent.

On the whole I am quite pleased with the results- clearly this is a quick fix not a super perfect fix, and it would be better to find trousers to fit to begin with.  But the elastic gives the trousers a bit of stretch meaning the gap in the back is closed but the trousers will stretch open if I'm having a fat day. 


Saturday, 8 September 2012

Halloween Costume Ideas

Well I don't if boyfriend and I shall be attending any Halloween soirees this season but that shan't stop me from thinking up some cool costume ideas.  Alas that an internet search of halloween costumes leads one to some unsavoury suggestions*, so here are some options I ave found that are awesome without being prostitutey.


There's wonder woman, Lego people, star trek, poison ivy, nautical, robots, Leela, Roy Lichtenstein, Daleks, 3d glasses, gun, Florence from the Magic roundabout, and Downton abbey.  I'm leaning heavily towards Wonder Woman as I already have high waisted denim shorts, but I can't think how to do the red boots on the cheap.  I thought about doing Florence last year but it became surprisingly expensive as I would have had to buy every component. I quite like the artiness of the Lichtenstein but I'm not really a make-up gal.  Watch this space...

*Incidentally if you are planning to put together an outfit that involves wearing pumps I suggest preparing yourself before typing 'pump' into your chosen internet search engine**
**If you choice is not google you are insane.

Monday, 3 September 2012

Home Made Rug

I decided to make a rug.  It's a decision that all women must make at some point in their lives and I have.
Eyeballing the space on my floor I decided to make a rug 80cm by 45cm, using scraps of fabric I already have, and to make it look like this.


I used a post on A Beautiful Mess for directions. 
To make it the correct size I need strips of fabric that are 155cm long, so the colour scheme made need to change based on what fabric I actually have. Which is this:

 I then cut the fabric into thin strips and plaited them into several long plaits.
I then glued the plaits onto a piece of weird blue fabric I had, that was nice and sturdy.  


I sewed along the edges of each plait, making sure to go through to the material underneath, then trimmed the edges to make them look intentionally uneven rather than the unintentionally uneven they were. And the finished result:


Wednesday, 22 August 2012

Pleated Work Skirt

I really needed a new work skirt but as usual was struggling to find anything I liked or fitted me properly.  So I bought some black fabric from the remnant bin for £3, and some cute anchor buttons 39p each so £2.34 for the 6 I bought.  I found a really useful tutorial for a pleated skirt with a great formula to help you work out  how much fabric you need for a pleated skirt.  Unfortunately I could not find my tape measure.  So I ignored the formula and just eyeballed some pleats in my rectangle of black fabric. 


It worked out fine.  After I pleated I tacked along the pleats, then folded some black fabric to make the waist band and sewed that on the top of the skirt (which at this point still looked like a rectangle).  I hemmed the edges of the fabric and sewed the buttons along the center edge, and button holes along the other.  I HATE button holes, and they look entirely crummy.  I hemmed the bottom of the skirt, and I was done.


Thursday, 9 August 2012

High Waisted Denim Shorts Finished!

As you may have seen in my previous post a while back I attempted some high waisted denim shorts, which were short-like but too imperfect even for me.  So several months later, I decided to see what I could make of them, and I'm quite pleased with the result.
I added pleats in the waist to take it in, and a longer zip to make it easier to get on, I made a waist band from some left over V and A fabric my sister gave me, and then I hemmed the bottom. :)


high waisted denim shorts

high waisted denim shorts


Tuesday, 7 August 2012

High Waisted Denim Shorts Attempt

I came across some nice blue denim and spontaneously decided I has always wanted some denim shorts- really the denim was too small to make much else.  I used another pair of shorts as a guide to draw around and cut out the denim accordingly.  You only need two different pieces for simple shorts (a front leg and a back leg, two of each so you cut out four pieces in total).  I sewed my pieces together and this was the result:


 As you can see they do look short-like, which is a good start.  But you can also see that they are too wide around the waist, which is why the zip is not sitting flat against my back.  But they are not purely 'too big' as you can not see how much I had to shimmey and squeeze into them just to get them on.  I think a longer zip will solve that problem, and the waist should be fixed with some pleats to take it in at the waist without losing the size around my hips and thighs.  The fact that the back and front of the legs are two different lengths may just have to remain an amusing quirk in these jeans!  Anyway watch this space, and hopefully Ill get back to you with awesome denim shorts :)


Monday, 30 July 2012

Pattern Haul

I recently accepted a giant bag full of fabric from boyfriend's parents (used some for the lining to my new denim bag) but inside there was also a decent stack of patterns in the bag too.  I haven't had chance to look through them properly but there seems to be a lot of excitingly seventies styles, unfortunately my preliminary scan suggest that none are in my size :(  But it's hard to tell as sizes have changed so much, and people have changed so much (for example I have made a dress with a 26"waist that fitted, I do not have a 26" waist as it would have required me to carry my internal organs around in a bag, but it was a hippie pattern from ye olden days and the "waist" size was actually about 6" higher than a modern waist measurement) so I will have to see what the measurements are and where they are taken from.


I particularly like these two, firstly for the awesome 70's hair, and secondly because those two women in the front are clearly bitching about the lame girl behind them.


Friday, 27 July 2012

Olympic Banner

Hastily Made whilst watching the preamble to the Olympic Ceremony from an old pillow case and scrap fabric:

Tuesday, 24 July 2012

New Denim Jeans Bag

Jean Bag

I made a bag from an old pair of jeans many moons ago and the denim has finally started to wear through- it's possible I've been over stuffing it!  So I used a donated pair of jeans from boyfriend to make a new one.   This one I made a lining with pockets to strengthen the body and also to give me some inside pockets- I found with my old bag it was slightly nightmarish to find my keys etc as everything fell to the bottom and they got lost.  I did have a zombie pirate keyring that helped me find them but I recently decided to retire him.

Jean Bag

Step 1- cut off the jean legs to create world's shortest cut offs.
Step 2/3- Sew the bottom of the legs
Step 4- Create the lining by simply copying the shape and size of the real bag, and hemming the top
Step 5/6- Look at essential items for bags to work out pocket sizes, cut out pockets lightly bigger than needed, hem the top edge of pocket then sew the other three edges (after turning them under the hide the raw edge) to the right side of the lining.
Step 8- Attach lining to bag, overlap edge of bag and edge of lining (both turned right side out) and sew
Step 9- This step is step 3, I am having an incompetent day!
Step10/11- Voila, I also tied an old belt around the belt loops to make the straps.


Friday, 20 July 2012

Studded Jeans


Well I'm not sure these jeans are the most flattering but I inherited them from boyfriend whose magnificent runners legs could not squeeze into them any more.  Also he had managed to burst open the crotch thusly:


As you can see it took me 4 patches to cover the holes!  I cut the bottoms of the jeans to make the patches so the denim mostly matches, although it is a slightly different shade as the bottoms were less worn than the crotch.  I was planning to cut these into cut offs but I don't the fit of the jeans would translate into very flattering shorts so I'm leaving them long for now.  Should we actually get a summer I may rethink this.

I bought some pyramidical studs from ebay to put on the jeans, they have spikey teeth that you push through the denim, then fold over to hold onto the jeans- I used a knife to bend them to save my delicate hands.  I didn't have enough to cover a whole leg, or even the top front of some cut offs so I just did a patch shape on the front.  Perhaps if I buy some more (and let's face it I will be studding everything from now on) I will cover more of the leg.


Monday, 9 July 2012

Felt Tie-Fighter

After a few weeks of looking at an increasingly crumpled paper tie-fighter prototype I finally got my act together and made one from felt.   A tie-fighter, btw, is a flying hexagonal thingymabob form Star Wars much loved by Star Wars fans, and very expensive to buy in lego form.

I copied from this picture:

And my felt version:


Felt Tie Fighter

Monday, 25 June 2012

Unscheduled Craft Hiatus Update

Bit of a lull in the old craft workshop, my elves have gone out to watch the Olympic torch or something and there's not much work being done.  Also I have been working more but for minimum wage so I haven't had lots of free time and definitely no free money.  And my days off have been spent doing other exciting things like going to the dentist and updating my Amazon account.

 I went with boyfriend recently to an Art Market and was inspired/impressed/put in my place by the awesome arts and crafts on show especially Butterscotch and Beesting from whom I bought a lucky dip pack for £2 and recieved a charcter straw, 3 menagerie cards, 5 guess the filling sweets, a magnet, and a sticker.  It's all very cute.  The 3 menagerie cards (in case you were wondering) each have part of a bird on them, one the head or a Peacock with the letter P, the next the body of a Pelican with the litters elli, and the last the feet of a Rooster with the letters ster- so put them together and make a Pellister!  The character on my character straw is a Froocan, a cross between a frog and toocan!

I'm thinking I might start doing craft fairs to make a bit of dosh from this hobby of mine...what do you think? Also how much would you pay for a small felt ninja? 
I'm also planning to go down to a local art gallery/craft centre to do one of their courses in September (missed the June starters) possibly drawing/painting, or creative writing.  They also do textiles and sewing classes but they are expensive plus you have to provide you're own materials and I'm not sure how much I would get from the course.


Please support my blog as a follower, thanks.

Friday, 8 June 2012

Cactus Pin Cushion

MeiJo Joy, Pin cushion, CactusWell I wish I could take credit for this idea because it's so cute and clever but obviously I stole it appreciated someone else's genius.  I got this idea from PC of MeiJo's Joy and followed her excellent tutorial.


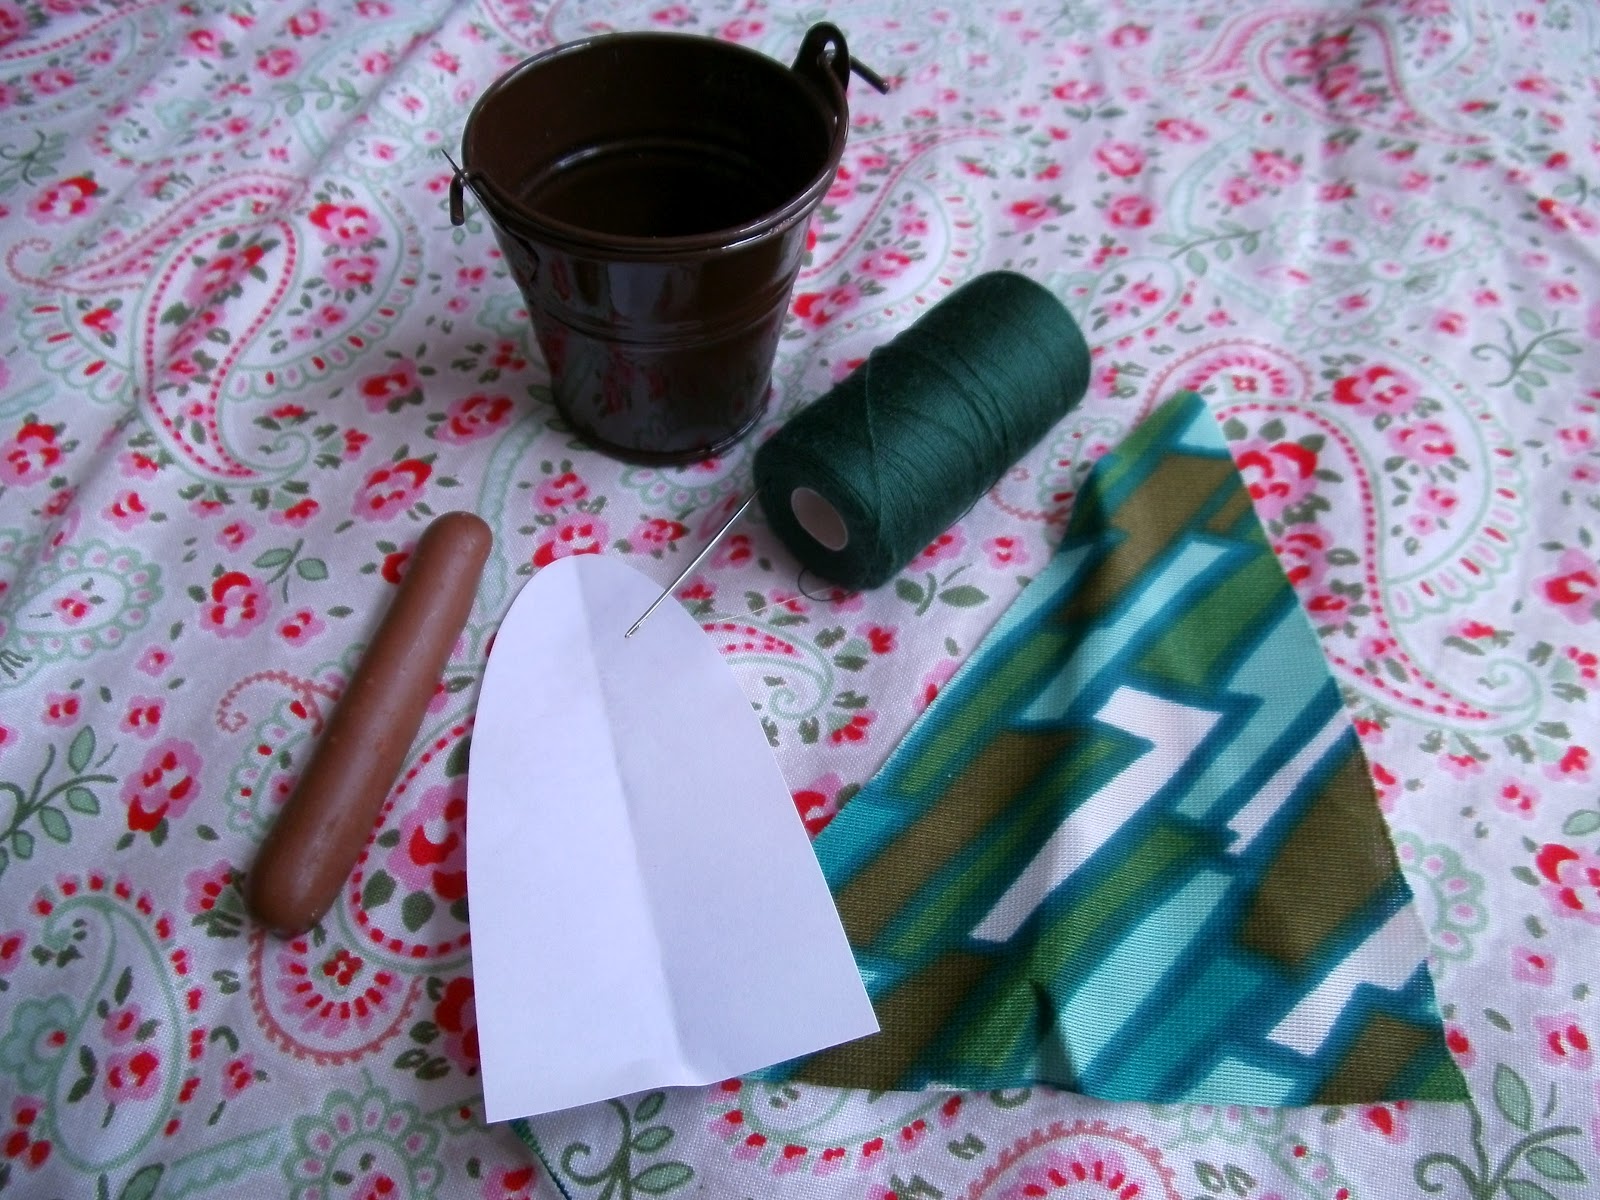
It's quite simple to make, first I collected my ingredients:
Spare green fabric, pot, thread, needle, paper template, and chocolate finger.  I also used some brown felt, stuffing, spare pink fabric, pins, and scissors.


I used my paper template to cute out 6 semi-ovals of green fabric, then sewed them into 3 pouches.
I turned the pouches inside out, then placed them on top of each other and sewed up the middle.  This created 6 gaps into which I stuffed the stuffing.


I sewed the bottom closed, and created a little pink flower for the top.  The hardest part for me was stuffing the pot (MeiJo's Joy has a tute for that but it didn't quite work for the pot I had), essentially I just covered some stuffing in brown felt and shoved it in the pot but making it the right size and getting it look nice was a bit fiddly.  I attached the cactus to the felt filling in the pot, and voila...#


Pin cushion, Cactus


Thursday, 7 June 2012

Just a quick update

Alas I have just discovered and reached the Blogger photo upload limit, and therefore had to delete quite a few of the photos I uploaded for the blog.  So I have reverted some of my early post back to drafts, while other posts may have unseeable pictures in them.  And for some reason my thumbnail has turned into a circle with a line through it.  I will also have to be more selective in the future about which photos I upload, so my blogs may be more chat less pics-sorry.

Wednesday, 6 June 2012

Ninja Lavender Bag


Ninja, Lavander Bag, I struggled to work out what to get boyfriend for our impending anniversary...I love giving and receiving presents, he does not.  And said boyf took seven weeks to give me a birthday present...so I can't hold out much hope for something in return...

But I love giving presents so perhaps this is my present to me? Well that's sad but regardless I have made him...a Ninja lavender bag!

I used my little felt ninja as a guide for how my lavender Ninja should look.  I made the Ninja the same way I made my Mario plushie; I drew my Ninja on some A4 paper, then cut it into the individual pieces.  I had some black cotton fabric from when I attempted to make a work skirt and some peach-ish fabric from an old pillow case for the skin.  I pinned the pattern pieces to the fabric and cut each bit out (very simple pattern; black body and arms, and two black strips for face and one peach strip for face).
Ninja, Lavender BagI used the handle of a paper bag wrapped in black thread for the ninja erm...stick...

Then I bought some lavender on Amazon (£5 for 250g approx), and filled the Ninja with lavender.
He can use it in his wardrobe or under his pillow to aid his poor sleeping.